The last post I made, I showed off one of the new rigs I had completed. The bad part about that rig, however, is that the mesh was bad. When exporting out of Maya, using ActorX, as an PSK, Maya either crashed, or after a while, output a message in the Maya output window, and did nothing. The message simply read:
processing mesh meshNameShape
It's my understanding that the modeler was using a new feature available to Zbrush that allowed seamless work-flow from Zbrush to Maya. Apparently, this feature has some bugs and could have possibly messed with the vertex order, or left bad history on the mesh. So if this happens to you, Here are a few things to try:
1. The mesh may contain bad history, or history unrelated to skin clusters. If this is the case, select your mesh and open your hypergraph. Click the button, Input and Output Connections. Here, you can see the nodes attached to your mesh. Find any node that is not related to skin clusters, or bones, and delete it. Typically they are along the lines of mesh tweaks, or tools that were used while modeling.
To prevent having to do this, always clean up your given mesh before binding it to your rig, which entails: deleting history, moving pivots to the world origin, freezing transformations, etc. Do not try these steps after binding because it will mess with your skin cluster data. If this issue comes up after you have finished your rig, you will more than likely have to re-import your mesh, and bind it to the skeleton again. Which brings us to our next method.
2. If you have tried everything in the first method, then try reimporting your geometry. Do not simply drag and drop the Maya file into your scene, it will just bring in the bad mesh again. Try exporting the geometry as different file types. The one that worked for me was an FBX file. The model was made of several pieces, so I exported each one in a separate file. I brought those into my scene, did a really fast dirty skin bind, and it still didn't work. I didn't give up!
My next step, was to detach the model pieces, combine each piece into one mesh, and cleaned up the model (delete history, etc.). This is highly not recommended. In my case, the model was not textured, or mapped properly in anyway, which meant that the model the artist had to work on, was the one I rigged. In a team environment, this is just plain bad. Luckily, not much was done to the model after I had received it, so all was not lost.
Having combined all the geometry, means the vertex order was rearranged, so any skin cluster history would be rendered useless. If you do this, know it will mean you have to bind the model to your skeleton again, and adjust any point weights again. That is what happened in my case, but the model exported just fine afterward, with the skeleton attached.
So here are some steps to follow before working any further on your rig, or skin weights:
- Bring in your model and clean it up! Delete history, move all the pivots to the world origin, freeze transformations, the works. Do not leave any unnecessary nodes laying about.
- Build your skeleton and do a quick skin bind to your mesh. Try exporting the mesh with the skeleton before working any further. If it exports just fine, great!. If not, try the next step.
- Talk with the modeler about how they worked on the model, and if they exported it from another program, look at their process and see where things might go wrong. If fixing their process doesn't work, let them know that you are taking the next step in order to get it to work, and see if it might hinder any of their work.
- Take the original mesh file, and export as a different file type. These can be anything from FBX to OBJ (recommended) but you may choose what you wish, so long as it fixes the problem. Bring in the new objects, do a dirty bind, and try exporting using ActorX. If that doesn't work, try step 5.
- with all your new geometry imported, combine all the pieces into one mesh. Renamed it appropriately, and attempt exporting with ActorX using a dirty smooth bind. If it works, continue working. If not, make a post on the forums for UDK.
I hope someone finds this tutorial useful. Please feel free to comment or send me an email. Just a note, this is my first time using ActorX. I have been using Maya for well over six years, and have worked on several other game engines, and these steps typically work on the Maya end of things.
Happy rigging!
 Finished another rig. Took about two days to complete after receiving the model. It's a mixture of FK and IK controls. The arms have an FK/IK switch and the legs are IK controls on. There are also spline IK's for the spin of the character, as well as some of the cloth. Right now, I am unable to do any kind of cloth simulations for the cloak and tabard, as deadlines are fast approaching for the project. There is a reverse foot set up, but this time I used groups and NURBS to create it.
This rig is created for the UDK engine. There are tons of resources out there for rigging characters in Max for UDK, but not so much for Maya. This rig is pretty special as its hierarchy needs to be set up to keep all bound joints out of the control hierarchy, and it's also using rig controls, which is not really common for UDK (typically requires mocap data). It's a mixture of constraints and work-arounds, but it is a manageable concept. Without this kind of set up in Maya, UDK will flip the bones based on the top most node in the hierarchy, but the geometry will import fine.
Also, this is one of my first high poly character rigs I have worked on extensively. A lot of the tools in Maya 2011 make rigging a breeze, especially some of the new skin bind features, for example, the interactive skin bind tool. This tool especially really helped getting very rough skin weights for the body mesh of the character. I will have a video shortly, showing off some of the controls I have set up for the character.
The model was provided by Vance Cole, who is one of the modelers for the project.
As I create more rigs, I continue to look for more things to automate. I've come up with a new script that creates cluster handles for selected control vertices. I use cluster handles to control the deformations in a spline IK curve for spines or what have you. It was irritating having to select the curve, convert to CV selection, select the CV, create the deformer, and repeat. With this script, you can simply select all of the CV's, and run the script. It will create a cluster handle for each CV and set them to relative, so the curve does not receive double translations when parented in the rig hierarchy.
It is a relatively short script so I will post it here in the blog:
//Catches CV's in a selection and creates a cluster deformer for each CV
ls -sl;
string $cjCVArray [] = `filterExpand -sm 28`;
for ($each in $cjCVArray) {
select $each;
newCluster " -relative -envelope 1";
select -cl;
}
I would also like to note that I have finished my FK control creation tool, and will post it as soon as I can find a way to host files for the blog.
Edit: So it was brought to my attention that Maya already has this function built into its menus... The good thing about this script, however, is that it taught me how Maya can use filters to get an array of selected components. Without the filter, your receive an array inside your array, which is pretty useless for what this script does. Basically, if you select CV's and run the script without a filter you get curve1.cv[0:4] instead of a list of each CV. Good practice.
My most recent project that I am working on has found a new engine to work with: NeoAxis. I have never come across this engine before, but I have figured out a few things when exporting objects with animations. I have set up a character from one of my other projects to demonstrate how to export characters or any other kinds of objects with animations, out of Maya and into NeoAxis.  This character has had all his geometry combined into a single mesh, and everything has been bound to a single skeletal hierarchy. He uses a very basic FK and IK set up (FK controls for the arms and IK handles and controls for the legs). Before we set up our export settings using the NeoAxis exporter (a tutorial is given on how to install the exporter, and can be found here http://www.neoaxisgroup.com/wiki/Documentation/Tutorials/Export_models_from_Autodesk_Maya ), we need to do some prep work.
A quick select should be made of all the bound joints inside the hierarchy (any bone that has geometry bound to it). To do this, select each bound joint individually, not just the root, and create your quick select set by going to Create > Sets > Quick Select Set... and name it however you please (the rigger should have done this to make the animator's life easier). For the purposes of this tutorial, assume all animations have been finished and you are ready to export. Select all the joints using your quick select set and go to Edit > Keys > Bake Simulation. Have your settings match the image below: For time range, use whatever you need for your scene.

Apply the bake, and then go to Modify > Evaluate Nodes > Ignore All Checked. We need to turn off all influencing constraints and IK's because the exporter for NeoAxis does not accept joints that are being influenced by anything, so we bake our animations to save them on the joints.
Open the NeoAxis exporter, and go to Settings. Click the add button (the green plus sign). In the next window, you will have to find the object shape, which can be found by clicking your geometry and going to the Attribute Editor inside of Maya. There you will find the shape node:


Select the appropriate node, and say OK. You will be brought back to the first window, with your character added. Make ExportSkeleton to be True. Click the Animations line and then the ... icon next to it:
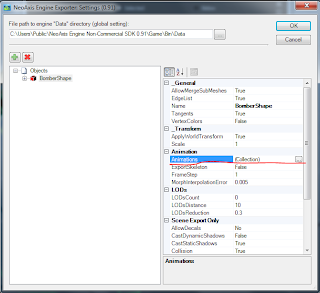
 In the Collection Editor, you can add all your animations to export. Name them appropriately and be sure they are using the Skeleton Format. Input the beginning and end frame for your animations. Here I have added the walk cycle for the Bomber which starts at frame 26 and ends at frame 49. Click OK and be sure to put the correct file path at the top as well and then click OK again. You will be taken back to Maya where you will select your geometry and then go to the NeoAxis Engine tab > Export, and in the new window, click Export!
Your model has been exported and is ready to be used in NeoAxis!

I have refined my earlier script to accept a selection of multiple joints. Basically, I have added a loop that runs through the selection, and creates, sets, constrains each joint to their respective control, and constrains the control group to the joint up in the hierarchy using a parent constraint. It looks something like this:
while ($positionInSelectionArray < $selectionArraySize) {
Create Control with part of joint name and orient it;
Freeze Transforms; Create Group for control;
Select Joint then Group;
Find the position of the joint in world space using xform;
Use xform to position the group to the joint's position;
Obtain the name of the NURBS control inside the group and select;
Add joint to selection;
Assign NURBS circle to $cjDriver;
Assign Joint to $cjDriven;
Find the group name and parent of the joint and assign them to variables;
Select $cjDriver;
Select $cjDriven;
Orient constrain joint to NURBS circle;
Select parent of joint; Select control group;
Parent Constrain control group to joint parent;
select -cl;
$positionInSelectionArray = $positionInSelectionArray + 1;
}
I am currently working on options in the GUI to allow the user to change the shape of their control NURBS to either a circle or star. There will be another option to either parent the control group to the joint's parent, or parent constrain the control group to the joint's parent. I am also working on an option so the user will be allowed to pick the axis to which the control NURBS will be oriented to. For example:
Currently the code is good for joints that point down the X axis of the joint chain. A user may be more comfortable with a different axis that points down their joint chain, say for example the Y axis. This extra option will rotate the circle to align with a user specified axis. Basically:
if (check box Y axis = true) {
Rotate circle to align with the y axis;
Freeze Transforms;
}
else if (check box Z axis = true) {
Rotate circle to align with the Z axis;
Freeze Transforms;}
This will allow the tool to be more robust and user friendly. Still working on hosting my scripts some where.

 Model by Peter Wonica.


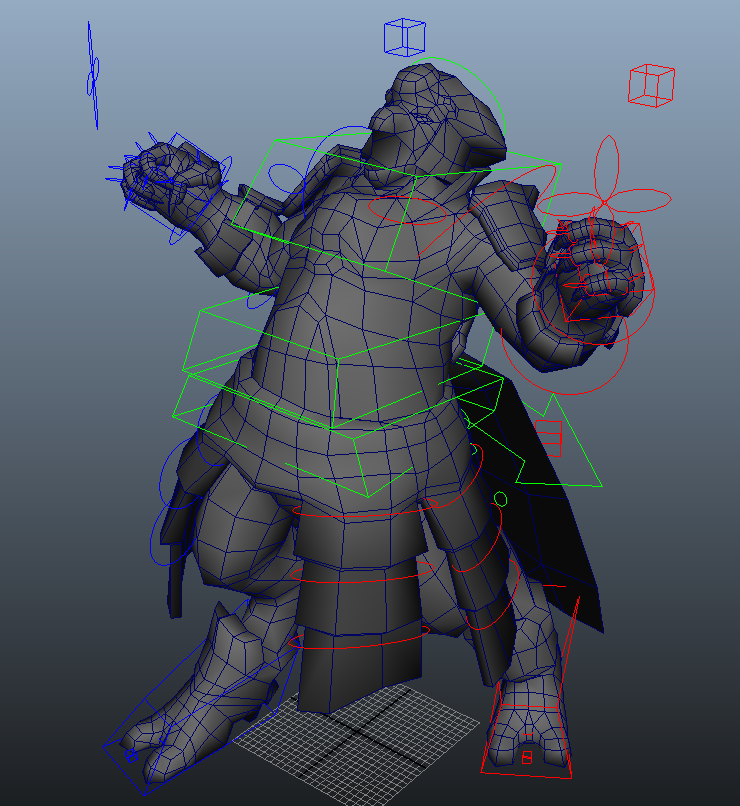


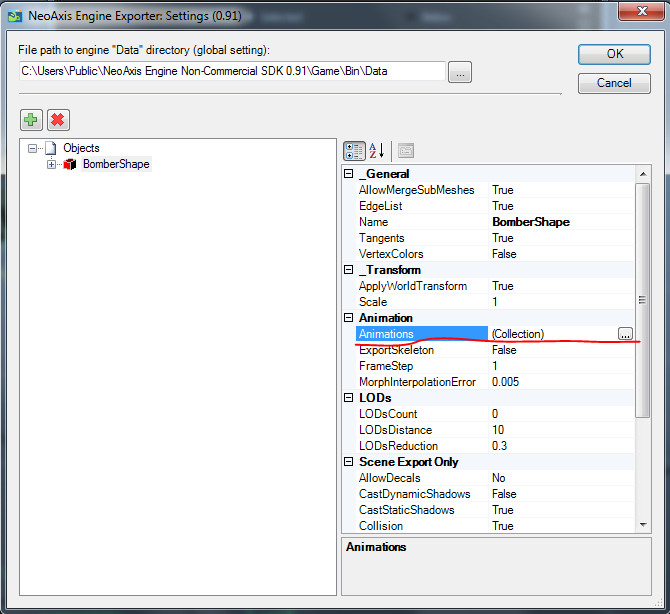
 In the Collection Editor, you can add all your animations to export. Name them appropriately and be sure they are using the Skeleton Format. Input the beginning and end frame for your animations. Here I have added the walk cycle for the Bomber which starts at frame 26 and ends at frame 49. Click OK and be sure to put the correct file path at the top as well and then click OK again. You will be taken back to Maya where you will select your geometry and then go to the NeoAxis Engine tab > Export, and in the new window, click Export!
