Been a while since I last posted an update and I just wanted to keep my blog alive. This spring is my last semester as a graduate student at the University of Texas at Dallas. As part of my graduate project, I am working on an animated short, that you can find here http://cabinfevershort.blogspot.com/ and I'm having to teach myself animation, as we lack animators for the project.
It's coming along very well! In fact I'm looking forward to posting some of the shots I personally worked on. I'm very proud of the work I've been doing for this short and I want to share it on my portfolio, but I want it to be perfect. So I'm still around, just working incredibly hard to finish my degree. I'm hoping to have something posted within the next week!

Showing posts with label Tutorials. Show all posts
Showing posts with label Tutorials. Show all posts
Wednesday, January 25, 2012

Friday, February 4, 2011
Troubleshooting ActorX for Maya
The last post I made, I showed off one of the new rigs I had completed. The bad part about that rig, however, is that the mesh was bad. When exporting out of Maya, using ActorX, as an PSK, Maya either crashed, or after a while, output a message in the Maya output window, and did nothing. The message simply read:
processing mesh meshNameShape
It's my understanding that the modeler was using a new feature available to Zbrush that allowed seamless work-flow from Zbrush to Maya. Apparently, this feature has some bugs and could have possibly messed with the vertex order, or left bad history on the mesh. So if this happens to you, Here are a few things to try:
1. The mesh may contain bad history, or history unrelated to skin clusters. If this is the case, select your mesh and open your hypergraph. Click the button, Input and Output Connections. Here, you can see the nodes attached to your mesh. Find any node that is not related to skin clusters, or bones, and delete it. Typically they are along the lines of mesh tweaks, or tools that were used while modeling.
To prevent having to do this, always clean up your given mesh before binding it to your rig, which entails: deleting history, moving pivots to the world origin, freezing transformations, etc. Do not try these steps after binding because it will mess with your skin cluster data. If this issue comes up after you have finished your rig, you will more than likely have to re-import your mesh, and bind it to the skeleton again. Which brings us to our next method.
2. If you have tried everything in the first method, then try reimporting your geometry. Do not simply drag and drop the Maya file into your scene, it will just bring in the bad mesh again. Try exporting the geometry as different file types. The one that worked for me was an FBX file. The model was made of several pieces, so I exported each one in a separate file. I brought those into my scene, did a really fast dirty skin bind, and it still didn't work. I didn't give up!
My next step, was to detach the model pieces, combine each piece into one mesh, and cleaned up the model (delete history, etc.). This is highly not recommended. In my case, the model was not textured, or mapped properly in anyway, which meant that the model the artist had to work on, was the one I rigged. In a team environment, this is just plain bad. Luckily, not much was done to the model after I had received it, so all was not lost.
Having combined all the geometry, means the vertex order was rearranged, so any skin cluster history would be rendered useless. If you do this, know it will mean you have to bind the model to your skeleton again, and adjust any point weights again. That is what happened in my case, but the model exported just fine afterward, with the skeleton attached.
So here are some steps to follow before working any further on your rig, or skin weights:
Happy rigging!
processing mesh meshNameShape
It's my understanding that the modeler was using a new feature available to Zbrush that allowed seamless work-flow from Zbrush to Maya. Apparently, this feature has some bugs and could have possibly messed with the vertex order, or left bad history on the mesh. So if this happens to you, Here are a few things to try:
1. The mesh may contain bad history, or history unrelated to skin clusters. If this is the case, select your mesh and open your hypergraph. Click the button, Input and Output Connections. Here, you can see the nodes attached to your mesh. Find any node that is not related to skin clusters, or bones, and delete it. Typically they are along the lines of mesh tweaks, or tools that were used while modeling.
To prevent having to do this, always clean up your given mesh before binding it to your rig, which entails: deleting history, moving pivots to the world origin, freezing transformations, etc. Do not try these steps after binding because it will mess with your skin cluster data. If this issue comes up after you have finished your rig, you will more than likely have to re-import your mesh, and bind it to the skeleton again. Which brings us to our next method.
2. If you have tried everything in the first method, then try reimporting your geometry. Do not simply drag and drop the Maya file into your scene, it will just bring in the bad mesh again. Try exporting the geometry as different file types. The one that worked for me was an FBX file. The model was made of several pieces, so I exported each one in a separate file. I brought those into my scene, did a really fast dirty skin bind, and it still didn't work. I didn't give up!
My next step, was to detach the model pieces, combine each piece into one mesh, and cleaned up the model (delete history, etc.). This is highly not recommended. In my case, the model was not textured, or mapped properly in anyway, which meant that the model the artist had to work on, was the one I rigged. In a team environment, this is just plain bad. Luckily, not much was done to the model after I had received it, so all was not lost.
Having combined all the geometry, means the vertex order was rearranged, so any skin cluster history would be rendered useless. If you do this, know it will mean you have to bind the model to your skeleton again, and adjust any point weights again. That is what happened in my case, but the model exported just fine afterward, with the skeleton attached.
So here are some steps to follow before working any further on your rig, or skin weights:
- Bring in your model and clean it up! Delete history, move all the pivots to the world origin, freeze transformations, the works. Do not leave any unnecessary nodes laying about.
- Build your skeleton and do a quick skin bind to your mesh. Try exporting the mesh with the skeleton before working any further. If it exports just fine, great!. If not, try the next step.
- Talk with the modeler about how they worked on the model, and if they exported it from another program, look at their process and see where things might go wrong. If fixing their process doesn't work, let them know that you are taking the next step in order to get it to work, and see if it might hinder any of their work.
- Take the original mesh file, and export as a different file type. These can be anything from FBX to OBJ (recommended) but you may choose what you wish, so long as it fixes the problem. Bring in the new objects, do a dirty bind, and try exporting using ActorX. If that doesn't work, try step 5.
- with all your new geometry imported, combine all the pieces into one mesh. Renamed it appropriately, and attempt exporting with ActorX using a dirty smooth bind. If it works, continue working. If not, make a post on the forums for UDK.
Happy rigging!
Saturday, January 22, 2011
Exporting Characters with animations into NeoAxis from Maya
My most recent project that I am working on has found a new engine to work with: NeoAxis. I have never come across this engine before, but I have figured out a few things when exporting objects with animations. I have set up a character from one of my other projects to demonstrate how to export characters or any other kinds of objects with animations, out of Maya and into NeoAxis.

This character has had all his geometry combined into a single mesh, and everything has been bound to a single skeletal hierarchy. He uses a very basic FK and IK set up (FK controls for the arms and IK handles and controls for the legs). Before we set up our export settings using the NeoAxis exporter (a tutorial is given on how to install the exporter, and can be found here http://www.neoaxisgroup.com/wiki/Documentation/Tutorials/Export_models_from_Autodesk_Maya ), we need to do some prep work.
A quick select should be made of all the bound joints inside the hierarchy (any bone that has geometry bound to it). To do this, select each bound joint individually, not just the root, and create your quick select set by going to Create > Sets > Quick Select Set... and name it however you please (the rigger should have done this to make the animator's life easier). For the purposes of this tutorial, assume all animations have been finished and you are ready to export. Select all the joints using your quick select set and go to Edit > Keys > Bake Simulation. Have your settings match the image below: For time range, use whatever you need for your scene.

Apply the bake, and then go to Modify > Evaluate Nodes > Ignore All Checked. We need to turn off all influencing constraints and IK's because the exporter for NeoAxis does not accept joints that are being influenced by anything, so we bake our animations to save them on the joints.
Open the NeoAxis exporter, and go to Settings. Click the add button (the green plus sign). In the next window, you will have to find the object shape, which can be found by clicking your geometry and going to the Attribute Editor inside of Maya. There you will find the shape node:


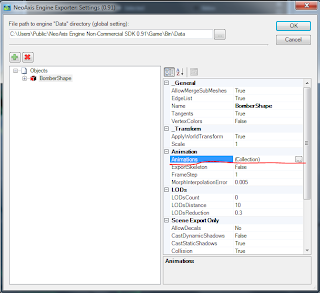
Select the appropriate node, and say OK. You will be brought back to the first window, with your character added. Make ExportSkeleton to be True. Click the Animations line and then the ... icon next to it:
 In the Collection Editor, you can add all your animations to export. Name them appropriately and be sure they are using the Skeleton Format. Input the beginning and end frame for your animations. Here I have added the walk cycle for the Bomber which starts at frame 26 and ends at frame 49. Click OK and be sure to put the correct file path at the top as well and then click OK again. You will be taken back to Maya where you will select your geometry and then go to the NeoAxis Engine tab > Export, and in the new window, click Export!
Your model has been exported and is ready to be used in NeoAxis!


This character has had all his geometry combined into a single mesh, and everything has been bound to a single skeletal hierarchy. He uses a very basic FK and IK set up (FK controls for the arms and IK handles and controls for the legs). Before we set up our export settings using the NeoAxis exporter (a tutorial is given on how to install the exporter, and can be found here http://www.neoaxisgroup.com/wiki/Documentation/Tutorials/Export_models_from_Autodesk_Maya ), we need to do some prep work.
A quick select should be made of all the bound joints inside the hierarchy (any bone that has geometry bound to it). To do this, select each bound joint individually, not just the root, and create your quick select set by going to Create > Sets > Quick Select Set... and name it however you please (the rigger should have done this to make the animator's life easier). For the purposes of this tutorial, assume all animations have been finished and you are ready to export. Select all the joints using your quick select set and go to Edit > Keys > Bake Simulation. Have your settings match the image below: For time range, use whatever you need for your scene.

Apply the bake, and then go to Modify > Evaluate Nodes > Ignore All Checked. We need to turn off all influencing constraints and IK's because the exporter for NeoAxis does not accept joints that are being influenced by anything, so we bake our animations to save them on the joints.
Open the NeoAxis exporter, and go to Settings. Click the add button (the green plus sign). In the next window, you will have to find the object shape, which can be found by clicking your geometry and going to the Attribute Editor inside of Maya. There you will find the shape node:


Select the appropriate node, and say OK. You will be brought back to the first window, with your character added. Make ExportSkeleton to be True. Click the Animations line and then the ... icon next to it:
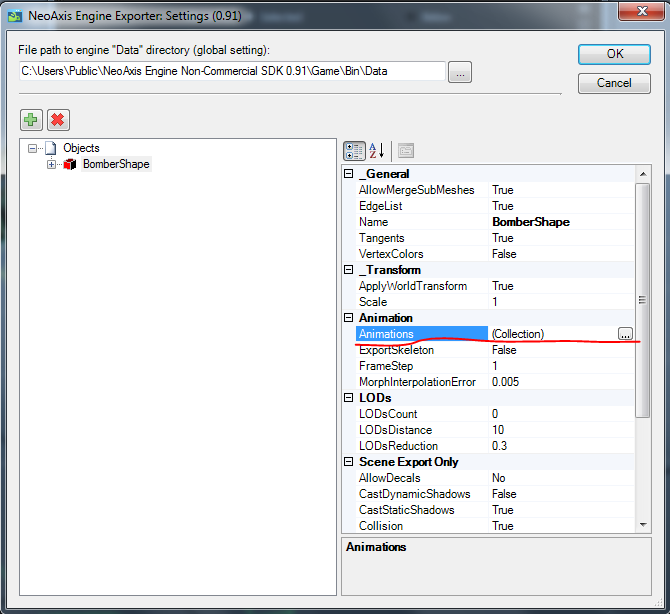
 In the Collection Editor, you can add all your animations to export. Name them appropriately and be sure they are using the Skeleton Format. Input the beginning and end frame for your animations. Here I have added the walk cycle for the Bomber which starts at frame 26 and ends at frame 49. Click OK and be sure to put the correct file path at the top as well and then click OK again. You will be taken back to Maya where you will select your geometry and then go to the NeoAxis Engine tab > Export, and in the new window, click Export!
Your model has been exported and is ready to be used in NeoAxis!

Subscribe to:
Posts (Atom)