
Sunday, December 4, 2011
Drop pod - Rigid Body Animation
For this animation, I used rigid bodies for the top and doors of the drop pod. The whole animation has the pod landing, and the doors bursting open. This was built for use in the UDK engine, but I can't show in game footage due to other circumstances.
Star Face's dynamic tentacles
Star Face's tentacles are looking pretty shnazzy! I used Maya hair to create the dynamics for his tentacles. Adjusted the stiffness if the hair follicles and added in sphere colliders for his chest. Makes his bottom tentacles slide across his body.
Tuesday, November 1, 2011
Rigging Philosophies: Joint naming conventions
This a new post to kick-start a new section of my blog. I was recently asked what were some of my "beliefs" when it comes to rigging. Basically how I think rigs should be made and how they should function. This will be a nice way to really start analyzing why I do things the way I do them. So let's get started.
When it comes to naming joints, some might think that naming them anatomically would be an ideal naming convention. Keeps things organized and you know exactly what that bone's function is. So why is this a problem? By default, Maya likes to organize deformers in the component editor alphabetically. This can be a problem when you start having clavicles, shoulders, and elbows. They can be misplaced within the component editor and make it difficult to see point weights side by side. Yes, you can filter out the zero'd channels but what happens when you give points a full weight of 1? going back and searching for it's neighboring deformers can become a pain! So here is my simple solution: Use numbers!
Let's use an arm for an example, starting from the clavicle: Instead of starting out with bind_L_clavicle01 lets go with bind_L_Arm001. From there we start getting our arm, starting from 001, 002, 003, and so on. With this naming convention, you know that it's on the left side arm, and that it's going to have geometry bound to it. Best part about this, in the component editor, all of your arm joints are side by side, making it incredibly easier to read and sort through.
So you might be asking yourself "This is great and all, but what about fingers?" I simply start with the thumb carpals and begin naming them like so: bind_L_D1_001, bind_L_D1_002, and so forth. With this naming convention, I know that it is a digit on the left side, and D1 means that it is the thumb. Now this does require a bit of mind training as you always start from the thumb and fan out from there. Once again, this is great because now all my fingers are all clumped together and easy to find.
I have found this naming convention to help me be a more efficient weight painter as well as making it easily readable for someone down the line. Now I only use this convention for deformers and joints in general. For controls I use a more anatomical approach as it makes more sense for an animator. Controls are also the representation for that area of the body and should be named as such, where as a deformer is part of the underlying framework of a rig.
Sunday, October 23, 2011
New Character Rig: Nym

Started, and almost finished, a new rig today for a project I've been working on with some friends of mine. She still needs a few tweaks but she is pretty close to being finished. Here she is in a bit of a pose to show off the rig a little better. She'll be in my next demo reel.

Sunday, September 18, 2011
Star Face WIP
Here is a rig I am currently working on for an animated short, Cabin Fever. His face tentacles are going to use Maya hair to give them some dynamic motion while he fights with the main character of the short. Coming along pretty well.

Creep Rigs
Here are some new rigs for a project I'm working for. Information about the project can be found here http://bloodpactgame.com/ . The models were provided by Daniel Ries, and you can find his portfolio here http://danielries.carbonmade.com/ .


Monday, September 12, 2011
Cabin Fever Rig WIP Video
It's been a while since I have posted. I'll be trying to update this blog all this month. Here is a video I forgot to share from one of my other blogs cabinfevershort.blogspot.com
Contributing modelers: Adam Chandler, Robert Reynolds, Liz Paradis, and Peter McCord.
Sunday, February 27, 2011
Creatures from another world!
Here are some samples of other rigs I have done. These are a bit out of the ordinary, but I like to show that I can do more than just biped characters. These were quite fun to rig and I love it when artists present an interesting challenge. I never turn down a weird idea.
Model by Peter Wonica.

 Model by Peter Wonica.


Model by Isaac Karth.


Model by Peter Wonica.

 Model by Peter Wonica.

Model by Isaac Karth.


Trigonis, the Blade Master
Here is a new character I have been working on recently. He is for the same game as the shadow assassin character I finished a few weeks back. She has also had an updated model that has been rigged and reskinned as well, so she will be coming back real soon. This particular rig uses a spring IK for the legs, to get the appropriate deformations. He's a bipedal, chicken man, so spring IK's work great here. He also has an FK/IK switch for his arms. Here are a few shots of a pose I put together for the post. The model was done by Daniel Ries.


Friday, February 4, 2011
Troubleshooting ActorX for Maya
The last post I made, I showed off one of the new rigs I had completed. The bad part about that rig, however, is that the mesh was bad. When exporting out of Maya, using ActorX, as an PSK, Maya either crashed, or after a while, output a message in the Maya output window, and did nothing. The message simply read:
processing mesh meshNameShape
It's my understanding that the modeler was using a new feature available to Zbrush that allowed seamless work-flow from Zbrush to Maya. Apparently, this feature has some bugs and could have possibly messed with the vertex order, or left bad history on the mesh. So if this happens to you, Here are a few things to try:
1. The mesh may contain bad history, or history unrelated to skin clusters. If this is the case, select your mesh and open your hypergraph. Click the button, Input and Output Connections. Here, you can see the nodes attached to your mesh. Find any node that is not related to skin clusters, or bones, and delete it. Typically they are along the lines of mesh tweaks, or tools that were used while modeling.
To prevent having to do this, always clean up your given mesh before binding it to your rig, which entails: deleting history, moving pivots to the world origin, freezing transformations, etc. Do not try these steps after binding because it will mess with your skin cluster data. If this issue comes up after you have finished your rig, you will more than likely have to re-import your mesh, and bind it to the skeleton again. Which brings us to our next method.
2. If you have tried everything in the first method, then try reimporting your geometry. Do not simply drag and drop the Maya file into your scene, it will just bring in the bad mesh again. Try exporting the geometry as different file types. The one that worked for me was an FBX file. The model was made of several pieces, so I exported each one in a separate file. I brought those into my scene, did a really fast dirty skin bind, and it still didn't work. I didn't give up!
My next step, was to detach the model pieces, combine each piece into one mesh, and cleaned up the model (delete history, etc.). This is highly not recommended. In my case, the model was not textured, or mapped properly in anyway, which meant that the model the artist had to work on, was the one I rigged. In a team environment, this is just plain bad. Luckily, not much was done to the model after I had received it, so all was not lost.
Having combined all the geometry, means the vertex order was rearranged, so any skin cluster history would be rendered useless. If you do this, know it will mean you have to bind the model to your skeleton again, and adjust any point weights again. That is what happened in my case, but the model exported just fine afterward, with the skeleton attached.
So here are some steps to follow before working any further on your rig, or skin weights:
Happy rigging!
processing mesh meshNameShape
It's my understanding that the modeler was using a new feature available to Zbrush that allowed seamless work-flow from Zbrush to Maya. Apparently, this feature has some bugs and could have possibly messed with the vertex order, or left bad history on the mesh. So if this happens to you, Here are a few things to try:
1. The mesh may contain bad history, or history unrelated to skin clusters. If this is the case, select your mesh and open your hypergraph. Click the button, Input and Output Connections. Here, you can see the nodes attached to your mesh. Find any node that is not related to skin clusters, or bones, and delete it. Typically they are along the lines of mesh tweaks, or tools that were used while modeling.
To prevent having to do this, always clean up your given mesh before binding it to your rig, which entails: deleting history, moving pivots to the world origin, freezing transformations, etc. Do not try these steps after binding because it will mess with your skin cluster data. If this issue comes up after you have finished your rig, you will more than likely have to re-import your mesh, and bind it to the skeleton again. Which brings us to our next method.
2. If you have tried everything in the first method, then try reimporting your geometry. Do not simply drag and drop the Maya file into your scene, it will just bring in the bad mesh again. Try exporting the geometry as different file types. The one that worked for me was an FBX file. The model was made of several pieces, so I exported each one in a separate file. I brought those into my scene, did a really fast dirty skin bind, and it still didn't work. I didn't give up!
My next step, was to detach the model pieces, combine each piece into one mesh, and cleaned up the model (delete history, etc.). This is highly not recommended. In my case, the model was not textured, or mapped properly in anyway, which meant that the model the artist had to work on, was the one I rigged. In a team environment, this is just plain bad. Luckily, not much was done to the model after I had received it, so all was not lost.
Having combined all the geometry, means the vertex order was rearranged, so any skin cluster history would be rendered useless. If you do this, know it will mean you have to bind the model to your skeleton again, and adjust any point weights again. That is what happened in my case, but the model exported just fine afterward, with the skeleton attached.
So here are some steps to follow before working any further on your rig, or skin weights:
- Bring in your model and clean it up! Delete history, move all the pivots to the world origin, freeze transformations, the works. Do not leave any unnecessary nodes laying about.
- Build your skeleton and do a quick skin bind to your mesh. Try exporting the mesh with the skeleton before working any further. If it exports just fine, great!. If not, try the next step.
- Talk with the modeler about how they worked on the model, and if they exported it from another program, look at their process and see where things might go wrong. If fixing their process doesn't work, let them know that you are taking the next step in order to get it to work, and see if it might hinder any of their work.
- Take the original mesh file, and export as a different file type. These can be anything from FBX to OBJ (recommended) but you may choose what you wish, so long as it fixes the problem. Bring in the new objects, do a dirty bind, and try exporting using ActorX. If that doesn't work, try step 5.
- with all your new geometry imported, combine all the pieces into one mesh. Renamed it appropriately, and attempt exporting with ActorX using a dirty smooth bind. If it works, continue working. If not, make a post on the forums for UDK.
Happy rigging!
Wednesday, February 2, 2011
Shadow Assassin Rig

Finished another rig. Took about two days to complete after receiving the model. It's a mixture of FK and IK controls. The arms have an FK/IK switch and the legs are IK controls on. There are also spline IK's for the spin of the character, as well as some of the cloth. Right now, I am unable to do any kind of cloth simulations for the cloak and tabard, as deadlines are fast approaching for the project. There is a reverse foot set up, but this time I used groups and NURBS to create it.
This rig is created for the UDK engine. There are tons of resources out there for rigging characters in Max for UDK, but not so much for Maya. This rig is pretty special as its hierarchy needs to be set up to keep all bound joints out of the control hierarchy, and it's also using rig controls, which is not really common for UDK (typically requires mocap data). It's a mixture of constraints and work-arounds, but it is a manageable concept. Without this kind of set up in Maya, UDK will flip the bones based on the top most node in the hierarchy, but the geometry will import fine.
Also, this is one of my first high poly character rigs I have worked on extensively. A lot of the tools in Maya 2011 make rigging a breeze, especially some of the new skin bind features, for example, the interactive skin bind tool. This tool especially really helped getting very rough skin weights for the body mesh of the character. I will have a video shortly, showing off some of the controls I have set up for the character.
The model was provided by Vance Cole, who is one of the modelers for the project.
Thursday, January 27, 2011
Cluster handle creation script
As I create more rigs, I continue to look for more things to automate. I've come up with a new script that creates cluster handles for selected control vertices. I use cluster handles to control the deformations in a spline IK curve for spines or what have you. It was irritating having to select the curve, convert to CV selection, select the CV, create the deformer, and repeat. With this script, you can simply select all of the CV's, and run the script. It will create a cluster handle for each CV and set them to relative, so the curve does not receive double translations when parented in the rig hierarchy. It is a relatively short script so I will post it here in the blog:
//Catches CV's in a selection and creates a cluster deformer for each CV
ls -sl;
string $cjCVArray [] = `filterExpand -sm 28`;
for ($each in $cjCVArray) {
select $each;
newCluster " -relative -envelope 1";
select -cl;
}
I would also like to note that I have finished my FK control creation tool, and will post it as soon as I can find a way to host files for the blog.
Edit: So it was brought to my attention that Maya already has this function built into its menus... The good thing about this script, however, is that it taught me how Maya can use filters to get an array of selected components. Without the filter, your receive an array inside your array, which is pretty useless for what this script does. Basically, if you select CV's and run the script without a filter you get curve1.cv[0:4] instead of a list of each CV. Good practice.
Saturday, January 22, 2011
Exporting Characters with animations into NeoAxis from Maya
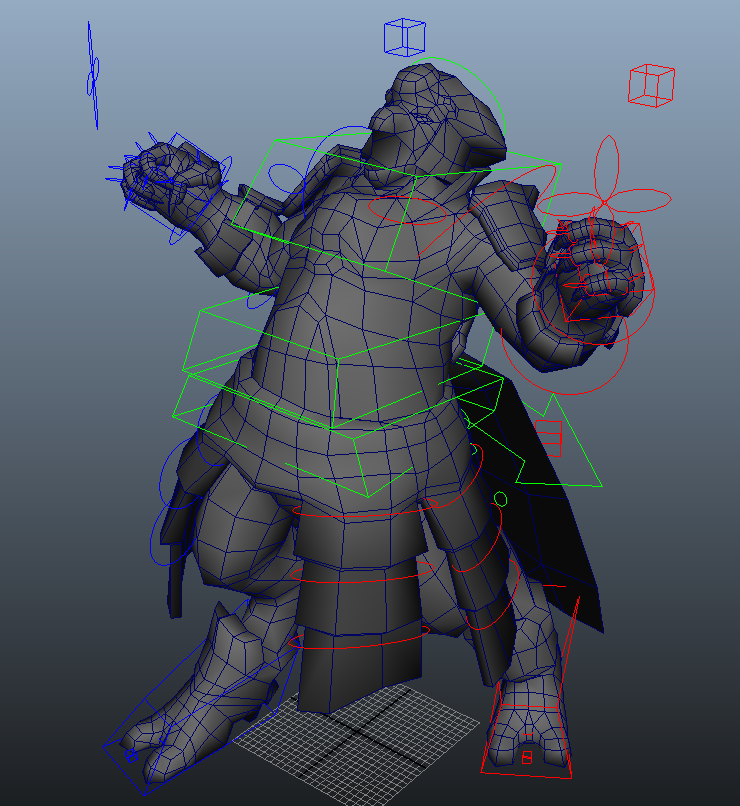
My most recent project that I am working on has found a new engine to work with: NeoAxis. I have never come across this engine before, but I have figured out a few things when exporting objects with animations. I have set up a character from one of my other projects to demonstrate how to export characters or any other kinds of objects with animations, out of Maya and into NeoAxis.

This character has had all his geometry combined into a single mesh, and everything has been bound to a single skeletal hierarchy. He uses a very basic FK and IK set up (FK controls for the arms and IK handles and controls for the legs). Before we set up our export settings using the NeoAxis exporter (a tutorial is given on how to install the exporter, and can be found here http://www.neoaxisgroup.com/wiki/Documentation/Tutorials/Export_models_from_Autodesk_Maya ), we need to do some prep work.
A quick select should be made of all the bound joints inside the hierarchy (any bone that has geometry bound to it). To do this, select each bound joint individually, not just the root, and create your quick select set by going to Create > Sets > Quick Select Set... and name it however you please (the rigger should have done this to make the animator's life easier). For the purposes of this tutorial, assume all animations have been finished and you are ready to export. Select all the joints using your quick select set and go to Edit > Keys > Bake Simulation. Have your settings match the image below: For time range, use whatever you need for your scene.

Apply the bake, and then go to Modify > Evaluate Nodes > Ignore All Checked. We need to turn off all influencing constraints and IK's because the exporter for NeoAxis does not accept joints that are being influenced by anything, so we bake our animations to save them on the joints.
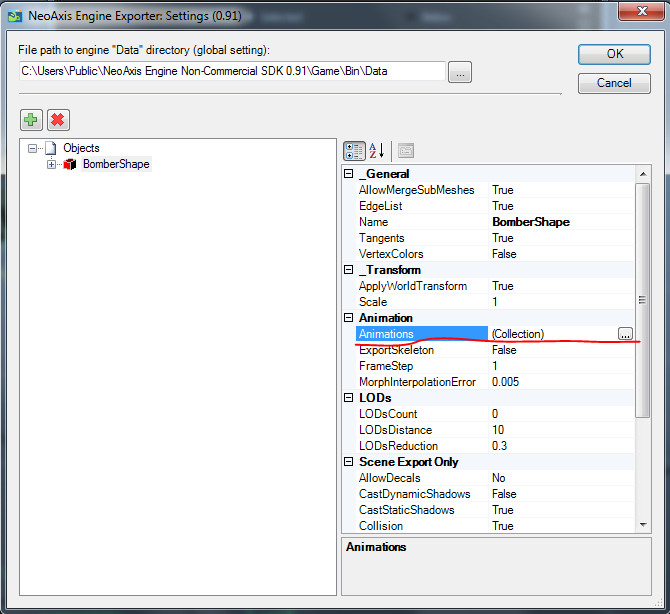
Open the NeoAxis exporter, and go to Settings. Click the add button (the green plus sign). In the next window, you will have to find the object shape, which can be found by clicking your geometry and going to the Attribute Editor inside of Maya. There you will find the shape node:


Select the appropriate node, and say OK. You will be brought back to the first window, with your character added. Make ExportSkeleton to be True. Click the Animations line and then the ... icon next to it:

 In the Collection Editor, you can add all your animations to export. Name them appropriately and be sure they are using the Skeleton Format. Input the beginning and end frame for your animations. Here I have added the walk cycle for the Bomber which starts at frame 26 and ends at frame 49. Click OK and be sure to put the correct file path at the top as well and then click OK again. You will be taken back to Maya where you will select your geometry and then go to the NeoAxis Engine tab > Export, and in the new window, click Export!
Your model has been exported and is ready to be used in NeoAxis!


This character has had all his geometry combined into a single mesh, and everything has been bound to a single skeletal hierarchy. He uses a very basic FK and IK set up (FK controls for the arms and IK handles and controls for the legs). Before we set up our export settings using the NeoAxis exporter (a tutorial is given on how to install the exporter, and can be found here http://www.neoaxisgroup.com/wiki/Documentation/Tutorials/Export_models_from_Autodesk_Maya ), we need to do some prep work.
A quick select should be made of all the bound joints inside the hierarchy (any bone that has geometry bound to it). To do this, select each bound joint individually, not just the root, and create your quick select set by going to Create > Sets > Quick Select Set... and name it however you please (the rigger should have done this to make the animator's life easier). For the purposes of this tutorial, assume all animations have been finished and you are ready to export. Select all the joints using your quick select set and go to Edit > Keys > Bake Simulation. Have your settings match the image below: For time range, use whatever you need for your scene.

Apply the bake, and then go to Modify > Evaluate Nodes > Ignore All Checked. We need to turn off all influencing constraints and IK's because the exporter for NeoAxis does not accept joints that are being influenced by anything, so we bake our animations to save them on the joints.
Open the NeoAxis exporter, and go to Settings. Click the add button (the green plus sign). In the next window, you will have to find the object shape, which can be found by clicking your geometry and going to the Attribute Editor inside of Maya. There you will find the shape node:


Select the appropriate node, and say OK. You will be brought back to the first window, with your character added. Make ExportSkeleton to be True. Click the Animations line and then the ... icon next to it:
 In the Collection Editor, you can add all your animations to export. Name them appropriately and be sure they are using the Skeleton Format. Input the beginning and end frame for your animations. Here I have added the walk cycle for the Bomber which starts at frame 26 and ends at frame 49. Click OK and be sure to put the correct file path at the top as well and then click OK again. You will be taken back to Maya where you will select your geometry and then go to the NeoAxis Engine tab > Export, and in the new window, click Export!
Your model has been exported and is ready to be used in NeoAxis!

Wednesday, January 19, 2011
FK Control Creation
I have refined my earlier script to accept a selection of multiple joints. Basically, I have added a loop that runs through the selection, and creates, sets, constrains each joint to their respective control, and constrains the control group to the joint up in the hierarchy using a parent constraint. It looks something like this:
while ($positionInSelectionArray < $selectionArraySize) {
Create Control with part of joint name and orient it;
Freeze Transforms; Create Group for control;
Select Joint then Group;
Find the position of the joint in world space using xform;
Use xform to position the group to the joint's position;
Obtain the name of the NURBS control inside the group and select;
Add joint to selection;
Assign NURBS circle to $cjDriver;
Assign Joint to $cjDriven;
Find the group name and parent of the joint and assign them to variables;
Select $cjDriver;
Select $cjDriven;
Orient constrain joint to NURBS circle;
Select parent of joint; Select control group;
Parent Constrain control group to joint parent;
select -cl;
$positionInSelectionArray = $positionInSelectionArray + 1;
}
I am currently working on options in the GUI to allow the user to change the shape of their control NURBS to either a circle or star. There will be another option to either parent the control group to the joint's parent, or parent constrain the control group to the joint's parent. I am also working on an option so the user will be allowed to pick the axis to which the control NURBS will be oriented to. For example:
Currently the code is good for joints that point down the X axis of the joint chain. A user may be more comfortable with a different axis that points down their joint chain, say for example the Y axis. This extra option will rotate the circle to align with a user specified axis. Basically:
if (check box Y axis = true) {
Rotate circle to align with the y axis;
Freeze Transforms;
}
else if (check box Z axis = true) {
Rotate circle to align with the Z axis;
Freeze Transforms;
}
This will allow the tool to be more robust and user friendly. Still working on hosting my scripts some where.
Tuesday, January 11, 2011
Starting to Script
I have been reading a book, "MEL Scripting a Character Rig in Maya," by Chris Maraffi. I'm still learning MEL syntax, but I have managed to create a couple tools from things I picked up from the book.
FK Control Creation
Using part of the author's script, I created an FK control creation tool. I took what Chris Maraffi wrote for his xform tool, and changed particular parts of it. His code queried the translations of an object using the xform command. Well, that works great with objects, but joints inside a hierarchy have transforms based on their parent joint. So, in order to find the transforms of a joint in the hierarchy, I used a world space flag (-ws) to find the transforms of any joint in the world space. From there I created a simple GUI that requests the user to input a part of the joint name they wish to remove.

For example: I select my joint "left_shoulder_bindJT". From here, I activate my arm control tool from the shelf. In the text field I input "_bindJT" which tells my tool to substitute "_bindJT" with blank space. I then select the "Create" button and my FK control NURBs Circle is created. The selected joint is then oriented to the control circle, and the group of the control circle is parent constrained to the joint's parent. For this example, the control is named "cc_left_shoulder" and the control group is named "grp_cc_left_shoulder" which is automatically done by the script.

I am currently working on a way to host the script, and when I do I will post it with instructions on how to use them.
Subscribe to:
Comments (Atom)