As I create more rigs, I continue to look for more things to automate. I've come up with a new script that creates cluster handles for selected control vertices. I use cluster handles to control the deformations in a spline IK curve for spines or what have you. It was irritating having to select the curve, convert to CV selection, select the CV, create the deformer, and repeat. With this script, you can simply select all of the CV's, and run the script. It will create a cluster handle for each CV and set them to relative, so the curve does not receive double translations when parented in the rig hierarchy. It is a relatively short script so I will post it here in the blog:
//Catches CV's in a selection and creates a cluster deformer for each CV
ls -sl;
string $cjCVArray [] = `filterExpand -sm 28`;
for ($each in $cjCVArray) {
select $each;
newCluster " -relative -envelope 1";
select -cl;
}
I would also like to note that I have finished my FK control creation tool, and will post it as soon as I can find a way to host files for the blog.
Edit: So it was brought to my attention that Maya already has this function built into its menus... The good thing about this script, however, is that it taught me how Maya can use filters to get an array of selected components. Without the filter, your receive an array inside your array, which is pretty useless for what this script does. Basically, if you select CV's and run the script without a filter you get curve1.cv[0:4] instead of a list of each CV. Good practice.

Thursday, January 27, 2011
Saturday, January 22, 2011
Exporting Characters with animations into NeoAxis from Maya
My most recent project that I am working on has found a new engine to work with: NeoAxis. I have never come across this engine before, but I have figured out a few things when exporting objects with animations. I have set up a character from one of my other projects to demonstrate how to export characters or any other kinds of objects with animations, out of Maya and into NeoAxis.

This character has had all his geometry combined into a single mesh, and everything has been bound to a single skeletal hierarchy. He uses a very basic FK and IK set up (FK controls for the arms and IK handles and controls for the legs). Before we set up our export settings using the NeoAxis exporter (a tutorial is given on how to install the exporter, and can be found here http://www.neoaxisgroup.com/wiki/Documentation/Tutorials/Export_models_from_Autodesk_Maya ), we need to do some prep work.
A quick select should be made of all the bound joints inside the hierarchy (any bone that has geometry bound to it). To do this, select each bound joint individually, not just the root, and create your quick select set by going to Create > Sets > Quick Select Set... and name it however you please (the rigger should have done this to make the animator's life easier). For the purposes of this tutorial, assume all animations have been finished and you are ready to export. Select all the joints using your quick select set and go to Edit > Keys > Bake Simulation. Have your settings match the image below: For time range, use whatever you need for your scene.

Apply the bake, and then go to Modify > Evaluate Nodes > Ignore All Checked. We need to turn off all influencing constraints and IK's because the exporter for NeoAxis does not accept joints that are being influenced by anything, so we bake our animations to save them on the joints.
Open the NeoAxis exporter, and go to Settings. Click the add button (the green plus sign). In the next window, you will have to find the object shape, which can be found by clicking your geometry and going to the Attribute Editor inside of Maya. There you will find the shape node:


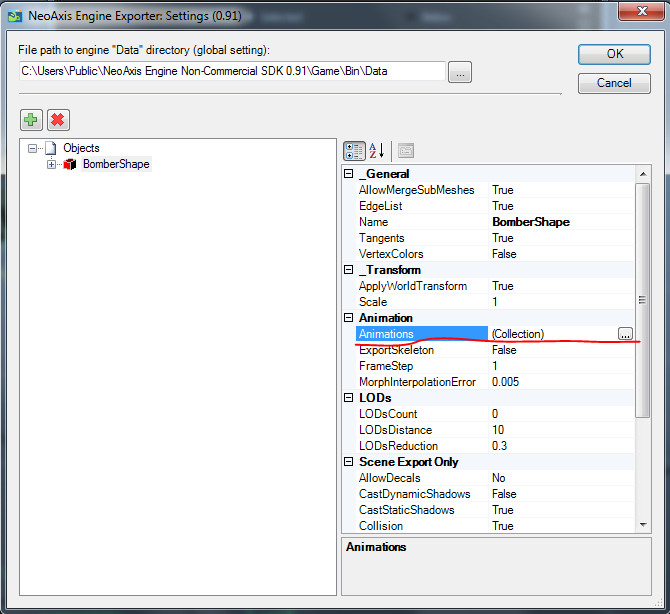
Select the appropriate node, and say OK. You will be brought back to the first window, with your character added. Make ExportSkeleton to be True. Click the Animations line and then the ... icon next to it:

 In the Collection Editor, you can add all your animations to export. Name them appropriately and be sure they are using the Skeleton Format. Input the beginning and end frame for your animations. Here I have added the walk cycle for the Bomber which starts at frame 26 and ends at frame 49. Click OK and be sure to put the correct file path at the top as well and then click OK again. You will be taken back to Maya where you will select your geometry and then go to the NeoAxis Engine tab > Export, and in the new window, click Export!
Your model has been exported and is ready to be used in NeoAxis!


This character has had all his geometry combined into a single mesh, and everything has been bound to a single skeletal hierarchy. He uses a very basic FK and IK set up (FK controls for the arms and IK handles and controls for the legs). Before we set up our export settings using the NeoAxis exporter (a tutorial is given on how to install the exporter, and can be found here http://www.neoaxisgroup.com/wiki/Documentation/Tutorials/Export_models_from_Autodesk_Maya ), we need to do some prep work.
A quick select should be made of all the bound joints inside the hierarchy (any bone that has geometry bound to it). To do this, select each bound joint individually, not just the root, and create your quick select set by going to Create > Sets > Quick Select Set... and name it however you please (the rigger should have done this to make the animator's life easier). For the purposes of this tutorial, assume all animations have been finished and you are ready to export. Select all the joints using your quick select set and go to Edit > Keys > Bake Simulation. Have your settings match the image below: For time range, use whatever you need for your scene.

Apply the bake, and then go to Modify > Evaluate Nodes > Ignore All Checked. We need to turn off all influencing constraints and IK's because the exporter for NeoAxis does not accept joints that are being influenced by anything, so we bake our animations to save them on the joints.
Open the NeoAxis exporter, and go to Settings. Click the add button (the green plus sign). In the next window, you will have to find the object shape, which can be found by clicking your geometry and going to the Attribute Editor inside of Maya. There you will find the shape node:


Select the appropriate node, and say OK. You will be brought back to the first window, with your character added. Make ExportSkeleton to be True. Click the Animations line and then the ... icon next to it:
 In the Collection Editor, you can add all your animations to export. Name them appropriately and be sure they are using the Skeleton Format. Input the beginning and end frame for your animations. Here I have added the walk cycle for the Bomber which starts at frame 26 and ends at frame 49. Click OK and be sure to put the correct file path at the top as well and then click OK again. You will be taken back to Maya where you will select your geometry and then go to the NeoAxis Engine tab > Export, and in the new window, click Export!
Your model has been exported and is ready to be used in NeoAxis!

Wednesday, January 19, 2011
FK Control Creation
I have refined my earlier script to accept a selection of multiple joints. Basically, I have added a loop that runs through the selection, and creates, sets, constrains each joint to their respective control, and constrains the control group to the joint up in the hierarchy using a parent constraint. It looks something like this:
while ($positionInSelectionArray < $selectionArraySize) {
Create Control with part of joint name and orient it;
Freeze Transforms; Create Group for control;
Select Joint then Group;
Find the position of the joint in world space using xform;
Use xform to position the group to the joint's position;
Obtain the name of the NURBS control inside the group and select;
Add joint to selection;
Assign NURBS circle to $cjDriver;
Assign Joint to $cjDriven;
Find the group name and parent of the joint and assign them to variables;
Select $cjDriver;
Select $cjDriven;
Orient constrain joint to NURBS circle;
Select parent of joint; Select control group;
Parent Constrain control group to joint parent;
select -cl;
$positionInSelectionArray = $positionInSelectionArray + 1;
}
I am currently working on options in the GUI to allow the user to change the shape of their control NURBS to either a circle or star. There will be another option to either parent the control group to the joint's parent, or parent constrain the control group to the joint's parent. I am also working on an option so the user will be allowed to pick the axis to which the control NURBS will be oriented to. For example:
Currently the code is good for joints that point down the X axis of the joint chain. A user may be more comfortable with a different axis that points down their joint chain, say for example the Y axis. This extra option will rotate the circle to align with a user specified axis. Basically:
if (check box Y axis = true) {
Rotate circle to align with the y axis;
Freeze Transforms;
}
else if (check box Z axis = true) {
Rotate circle to align with the Z axis;
Freeze Transforms;
}
This will allow the tool to be more robust and user friendly. Still working on hosting my scripts some where.
Tuesday, January 11, 2011
Starting to Script
I have been reading a book, "MEL Scripting a Character Rig in Maya," by Chris Maraffi. I'm still learning MEL syntax, but I have managed to create a couple tools from things I picked up from the book.
FK Control Creation
Using part of the author's script, I created an FK control creation tool. I took what Chris Maraffi wrote for his xform tool, and changed particular parts of it. His code queried the translations of an object using the xform command. Well, that works great with objects, but joints inside a hierarchy have transforms based on their parent joint. So, in order to find the transforms of a joint in the hierarchy, I used a world space flag (-ws) to find the transforms of any joint in the world space. From there I created a simple GUI that requests the user to input a part of the joint name they wish to remove.

For example: I select my joint "left_shoulder_bindJT". From here, I activate my arm control tool from the shelf. In the text field I input "_bindJT" which tells my tool to substitute "_bindJT" with blank space. I then select the "Create" button and my FK control NURBs Circle is created. The selected joint is then oriented to the control circle, and the group of the control circle is parent constrained to the joint's parent. For this example, the control is named "cc_left_shoulder" and the control group is named "grp_cc_left_shoulder" which is automatically done by the script.

I am currently working on a way to host the script, and when I do I will post it with instructions on how to use them.
Subscribe to:
Comments (Atom)